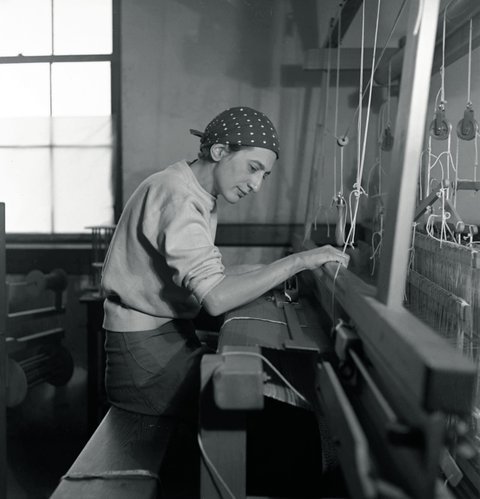
Anni Albers was a German artist born in Berlin in 1899. She was very interested in art from a young age. Albers studied at the Bauhaus. The Bauhaus was an exciting school of art and design in Germany. At the time, women were only allowed to study a few classes. Anni decided to study weaving and became one of the greatest textile artists of our time!
Albers used a loom to weave. A loom is a machine that makes cloth out of wool or other threads. You can make your own loom at home and turn wool into a beautiful mini-rug!

Anni Albers Black White Yellow 1926, re-woven 1965 Lent by The Metropolitan Museum of Art, Purchase, Everfast Fabrics Inc. and Edward C. Moore Jr. Gift, 1969 (69.134) © 2018 The Josef and Anni Albers Foundation/Artists Rights Society (ARS), New York/DACS, London

Anni Albers Red Meander 1954 Private Collection © 2018 The Josef and Anni Albers Foundation/Artists Rights Society (ARS), New York/DACS, London

Anni Albers Study for Unexecuted Wallhanging 1926 The Josef and Anni Albers Foundation © 2018 The Josef and Anni Albers Foundation/Artists Rights Society (ARS), New York/DACS, London
Here's some of her textile artworks. Look at all of the bright colours! Which one is your favourite?
Ready to make your own? Let's have a go!
You will need

- Coloured wool (3 or 4 colours is best)
- Scissors
- Ruler
- Lolly sticks
- Cellotape
- Glue
- 2 Cardboard strips (15cm x 3cm)
- Piece of cardboard (15cm x 18cm)
Ready? Let's start ...

1. To make your loom, draw a box 1cm inside the big piece of cardboard. Cut 11 slits, 1cm apart on the top and bottom edge. Next, glue the 2 strips of cardboard to sit at the end of the slits

2. Wind a piece of wool up and down through the top and bottom slits, moving across the cardboard

3. The back should look like this. Tie a knot to keep in place

4. Choose your first colour and cellotape a long piece of wool to a lolly stick. Thread the stick from one side of the cardboard to the other, crossing over and under the wool threads

5. Keep adding rows, alternating the over and under threads until you're happy with the thickness of your first colour. When you decide to finish with a colour cut it from the lolly stick

6. Repeat this with your second colour. When adding new colours make sure to leave the end and starting threads long enough so you can knot them later

7. Keep weaving under and over until you have filled your loom

8. Next, unhook the threads from the top and bottom

9. Pull the threads from the bottom end to tighten the top ones. Then tie the bottom threads and the loose ends in knots

10. Finished! Looks great
This activity was made in collaboration with OKIDO.