
Johan Zoffany
Charles Macklin as Shylock (c.1768)
Tate
Johan Zoffany Charles Macklin as Shylock 1768
Charles Macklin as Shylock 1768 is a theatrical scene integrating portraiture into a dramatic conversation piece. This painting is especially interesting as it is unfinished. Parts of the composition, such as the background and some of the figures, are sketched in with loose brushstrokes barely covering the canvas preparation. This contrasts with some of the portrait faces which are highly finished with Johan Zoffany’s characteristic and familiar fine brushwork and attention to small detail.

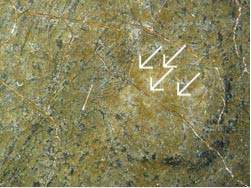
Detail of Gratiano’s hand, deftly sketched with pink and brown paint on top of the beige coloured canvas preparation. The arrows show areas of exposed ground on the canvas.
A discoloured and opaque varnish
A magnified image of Antonio’s coat button. The brown patches highlighted are discoloured varnish.
The main conservation issue with this painting is that its varnish is very discoloured and opaque, distorting the colours, obscuring details and reducing the illusion of three–dimensional space created by the artist. Under the microscope, details such as Antonio’s coat button are almost obscured by yellow–brown varnish. More than one layer appears to be present and in many places there are patchy residues of older varnish.
The varnish has not been removed since the painting was acquired by Tate in 1951 but it has been ‘reformed’ twice. Reforming is an old-fashioned technique which was used to try to restore transparency and smoothness to cracked and opaque varnishes – rejuvenating them and postponing the need for varnish removal. The old reports do not explain why this varnish was reformed rather than removed. Conservators at the time may have expected varnish removal to be difficult.
Testing the varnish to remove it safely
The first stage of treatment was to test the discoloured varnish layer to see if it could be removed safely. Trial solvents and solvent mixtures were applied on small cotton-wool swabs to find those that would remove the varnish but leave the various different paint passages unaffected. During this process, it can be helpful to keep the used swabs so that the colour and amount of varnish removed by the trial solvents can be compared. Results were good, indicating that the varnish was soluble in a mild solvent mixture.

Working on the painting in the conservation studio.

The careful observation and documentation of tests.
In all test sites the true cool tones of the original paint were revealed once the thick, glossy and brown varnish layer was removed. These results showed that it was safe to proceed with varnish removal across the whole surface of the painting and cleaning began with encouraging results.

A cleaning test showing the successful removal of discoloured varnish from Gratiano’s coat tail.

Detail of one of the judge’s heads during varnish removal. The cleaned area is matt and dry looking due to the lack of a varnish. At the end of the treatment, a new varnish will be applied, saturating the paint surface and intensifying the colour again.
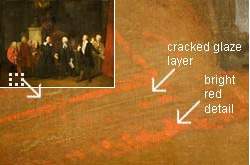
Detail of the red rug in the left foreground after varnish removal, showing cracked red transparent glaze and bright red strokes forming the rug’s pattern.
In the foreground of the composition, a cracked but intact transparent red glaze was discovered beneath the discoloured varnish, applied over the brown foreground and forming the background colour of a red rug, its details picked out using bright red vermilion paint.
Ultraviolet light reveals an older varnish
Approaching the bottom left corner, removal of the varnish became less straightforward. It was impossible to completely remove all the varnish present and the solvent mixture appeared to remove unoriginal overpaint which was not present in other parts of the painting. Examining the painting under ultraviolet light is a very useful way of monitoring varnish removal, as a natural resin varnish fluoresces brightly while a clean paint surface will remain dark.
When this painting was viewed under ultraviolet light the upper parts showed relatively little fluorescence, indicating a more or less complete removal of the varnish. However the lower part of the painting continued to fluoresce brightly, showing that the cleaning process was not removing all the varnish from the paint surface. This is probably because the painting was ‘selectively’ cleaned by a previous restorer, who removed varnish from the areas that were safe and easy to clean, but left the varnish alone in any problem areas. The layer now uncovered at the bottom left is likely to be an older varnish, which will prove more difficult to remove and which may be covering soft and soluble paint.

The painting during varnish removal. The highlighted area on the left shows where the upper layer of varnish has been removed. On the right, the painting is viewed under ultraviolet light showing the layers of varnish.
Next step: testing the older varnish layers
When the upper varnish layer has been removed from the whole of the painting, the next stage of the cleaning process will be to investigate the solubility of these older varnish layers and to see if they can also be safely removed from the vulnerable paint below.